Friday, March 18, 2011

Project : Face Lifted. Part II.

The next day after checking the stuffs that had been sent to me, only to found out that the square headlight is from a Datsun B310. Also in other word, the square headlight used here is the universal square type. Can fit most car, such as B310, Blackbelt, the KE72, KE74, and also noticed that the 180SX also using the same head light.

Knew about the 180SX headlight coz the other day, decided to have a shotgun ride with the foreman during testing. Although it end up on a roadside after having a clutch pump failure.
http://a6.sphotos.ak.fbcdn.net/hphotos-ak-snc6/200557_10150125859237002_643222001_6473095_5167230_n.jpg

Back to the observation, I noticed that the lamp given to me is a seal beam type. Meaning that there's no bulb change. Once broken, replacement is a new unit of this thing. Which also mean I cannot use my trademark Blue/White H4 bulb if I am using this. Anyone interested with my used set? Selling it at RM40 only.

Although they said that seal beam produce brighter light, I still prefer my old bulb. So, asked them to order a new non-seal beam headlight. Depo from Taiwan.

There goes my favorite blue reflection on a headlamp.

Interior had been stripped out for major rewiring.

Since I got a lot of free time, and was provided with this stuff:

Polished my old bumper to its glorious shine. As good as new.

Some Autosol and polishing in progress.

What else can be shine? The Equip - Yes. The Riverside - No.

See how buff it is!

Done!

End of Part II.

Project : Face Lifted. Part I.

Rolla had been inside workshop for like a week already. Progress is pretty slow as I told them to take their time especially when it comes to wiring stuff. Others? I do it myself to save up their time. Plus why not? Its my own car. Anyway, the car is at Speedster Garage just in case you guys are searching for a suitable workshop to do stuffs. Been spending my time a lot there now.


Goodbye DX face. Not gonna use you anymore.


Also took the opportunity to install the anti-roll bar. Red color looks striking on the plain bottom.


Selling my used chrome bumper for RM230. Complete stuff and also bought new last year. Except for the plate no which I will use it back. :P


Earlier, the plan was to convert to a GL facelift. Which then I got a GL set when I swapped everything from my DX with a friend. Shown here was during the painting process. This time I am only going to use can spray to save budget. Used up to 6 cans for white color and clear coat. This will do for the time being.


After taking some time and few seller approach me with a different type of face lift, I decided to go for it and instead of swapping to GL, I am going to use the KE74 face lift. Which is quite rare and pretty expensive. Shown here is the RG bumper. Bought a used one. Reason wise? I want the bracket.


Bumper is from Perlis, while the face lift is from Penang. Here's another box arrived at the same week. A complete set of KE74 face, a new RG side cap and a new RG signal.


Still in a good condition. Thanks to the honest seller from Penang.


End of Part I.

Featured In : FreshPhysics. Round II.

http://freshphysics.files.wordpress.com/2011/03/toon_ke_amar_gencos.jpg?w=334&h=399

Again, another art created by Nenok. Had been using this as my handphone wallpaper and also my Avatar for most forum I lurked. Unfortunately; I am not going to sport this facelift anymore. Thanks again bro.

KE70 Variants.

Finally at home again with a proper internet. Celcom Broadband sucks. Anyway, its time to do some updates. A week ago I learned that there's a few more types of model for Corolla KE70. Other than the three common type, there's a few more actually.


First, the DX. Which have a quad headlight feature.

http://noriyaro.com/wp-content/uploads/2009/02/ke70_corolla_at_nikko_002.jpg


Then, there's also a DX Blackbelt. Which feature a small square head lamp.

http://farm4.static.flickr.com/3102/2734621601_d191081905.jpg


And finally the GL facelift.
http://speedhunters.com/cfs-filesystemfile.ashx/__key/CommunityServer.Components.PostAttachments/00.00.14.72.42/KE70_2D00_STD.jpg_2D00_672x9999999.jpg


And the not so famous; which I called slanting face. Mostly on wagon here in Malaysia.
http://img91.imageshack.us/img91/754/ke70sprint01jv1.jpg

And then, after lurking and asking around a seller during my purchase, only then I knew that there's three more types for wagon version. From what I understand,


This is a KE72. Confirm fit a GL fender set and a Blackbelt face. Mix-match combo.
http://a8.sphotos.ak.fbcdn.net/hphotos-ak-ash4/189375_104008046348989_100002193810372_34728_558847_n.jpg

And this is a KE74. Different type of fender and still retain the same square headlamp for Blackbelt and KE72.

And finally, the rarest of em all, the KE76. Actually the same with KE74 but with different grill.

As you can see, most wagon were fitted with an RG bumper. Its different from the DX nor rubber GL bumper. Which is the nicest of em all if you asked me. There's still a lot if I am going to explain and compare the variants but I think this should be enough.

*Photo credits belong to original photographer ya. I am just Googling it.

Friday, March 4, 2011

Retro Bodykits New Stuff.

Back to Rolla, there's some updates but all had been quite slow since I was busy with exams, with the model kits, and also the new love for 125z. LOL. I guess I cannot focus on a few things. Gotta straight up again.

Okay so Retro Bodykits has a new type of front spoiler, and the tokey, Mr. Jeya had sent me one as a sponsor stuff and as for promotional use. Big thanks to him for the new spoiler. Before I proceed, here's my old front spoiler, which I called it Retro Bodykits Type 1.
http://a8.sphotos.ak.fbcdn.net/hphotos-ak-snc4/67195_133005476750548_100001232899353_201161_6059968_n.jpg

While on Rolla:
http://a5.sphotos.ak.fbcdn.net/hphotos-ak-ash2/76816_468659822001_643222001_5542925_614753_n.jpg

Here's the new front spoiler, which I called it Type 2. There's various sizes to fit most old schools. Retro Bodykits had send two of it. And one of it had been sold to a nice couple from Brunei which had been so determine to restore their Corolla. Best luck for them. Will do some update when I actually meet them maybe at the end of the month.
http://a5.sphotos.ak.fbcdn.net/hphotos-ak-snc6/182923_10150110540777002_643222001_6334311_2237295_n.jpg

After fitting it on Rolla, this new spoiler fitted more nicely compare to Type 1 since my body part is not properly aligned thanks to the previous accident.
http://a6.sphotos.ak.fbcdn.net/hphotos-ak-snc6/181752_10150110605547002_643222001_6335076_5290852_n.jpg

Side view:
http://a6.sphotos.ak.fbcdn.net/hphotos-ak-ash4/184704_10150110689972002_643222001_6335705_1401149_n.jpg

My new top mount screw as the old one kept loosen. A wheel stud!
http://a6.sphotos.ak.fbcdn.net/hphotos-ak-snc6/184310_10150110697842002_643222001_6335739_6023926_n.jpg

Another new stuff going in.. A recondition anti-roll bar.
http://a2.sphotos.ak.fbcdn.net/hphotos-ak-ash4/183029_10150110540437002_643222001_6334308_4084196_n.jpg

After this, a GL face lift and then its time to repaint back Rolla to its glorious white color.

Friday, February 25, 2011

Friday the 25th.

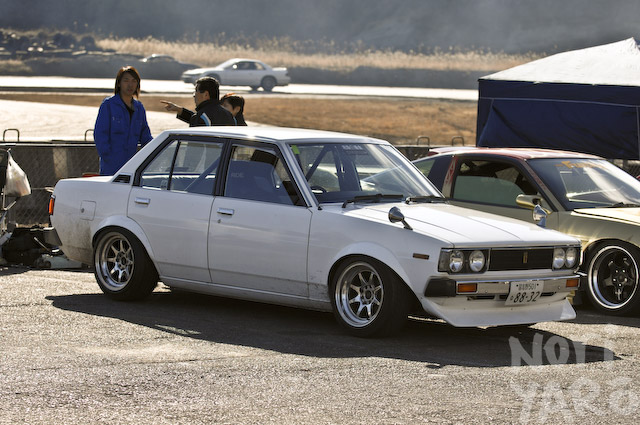
Okay, other than the court case, tried to comfort myself by doing some works so that I'll be occupied. And after finished my 1st week exam, decided to went back to Mok's house since she's doing some cuppies that people ordered. Fugly without the front spoiler.

And there's some noise that had been bugging me since I bought the rear AE86 adjustable. There's this squeaky noise every time there's movement. I do suspect the bushing would be the problem. So, jacked up Rolla and I was using anything that is available that time.

And the adjustable was removed. Some people were already asking what adjustable is this. This is an adjustable set for the Corolla AE86 by a local company, ACE suspension. Yes it is a coil over. Yes I do not need to use the separate spring and absorber and yes, it is plug and play. Hope it helps.

Upon inspection, found out that the top bushing on the absorber was not on the correct size. It should be fitted nicely not this loose.

I was thinking of putting some grease and hope it will stop the squeaky noise. Until I checked the bushing for the mount. Okay, I am noob. #Fact. Some awesome dude think I am very noob. Also #Fact. So I just think logically and I don't have any automotive experience. And you know what, I don't give a shit. #Also the third Fact.

Here's the absorber bushing. For below the dust cover and on top of the dust cover.

And the top mount bushings. Noticed that the top had two bushings but different in size.

So I just removed the bigger diameter bushing for the top mount and fit everything back. And greased everything necessary. And the squeaking noise is gone now. I am happy again. Anyway, found out that the bottom screw's thread had worn out. Went to a local workshop to have some spare screws. The absorber will pop off (a lot of chances to occur) for sure.Lucky me and hopefully nothing will happen after this.


While the car was still on the jack, I tried this thing. Some sort of tar rubber for the undercarriage. Once it dried, it will become gummy. Act as a anti-rust and also sound deadening.It is very thick and I had to use kerosene to dilute it.

Did the tire arch, and also all undercarriage from front till back. And I am a messy dude after that. #
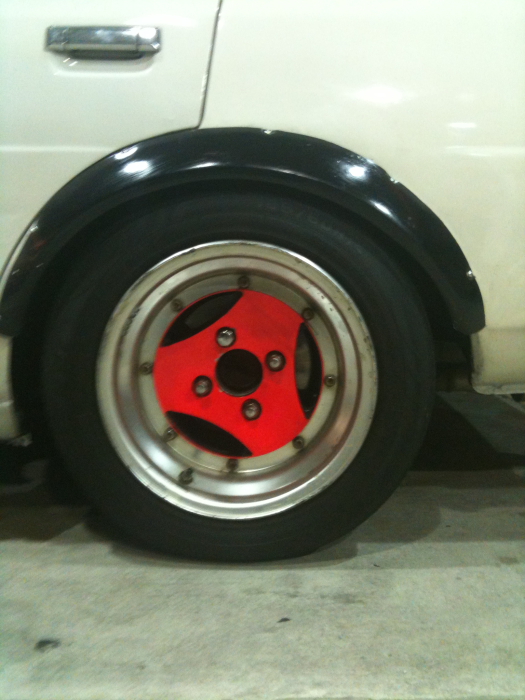
Fact; I am running 1' spacer on the rear set so that my pussy offset wheels will be pushed more to 'fill' the over fender. Coz my rims doesn't have a -10 offset.

When its done and while I was filling some gas, I noticed that the rear set had gone even lower than before. I am happy with the stance now and also no more scraping hump problem after rerouting the exhaust pipe.

Tuesday, February 22, 2011

Piping Reroute & De-Lip.

After surviving 1 week plus in the campus, the piping decided to crack at a point because of too much tension when having contact with the hump. Sounds like a rotary engine, but slower than a Myvi. Decided to swirl around in the Skudai area, and arrived at an exhaust shop + workshop. Which happened to be the workshop for JB Drift Club.

A mechanic then helped me to fix the piping. What he did was heating the extractor so that it can be bend more upward and re weld all the exhaust piping so that it get closer to Rolla's floor board. In other word, if you look from side now, you wont see any exhaust piping popping out from the bottom. All you see now is the floor board. Clean.

After the job was done, only then I knew his name. The man who did the job is the one who drove the A31 for Drift Zone JB, Mr. Shairul. A well known group and team member in JB was doing my car. Now that's improvement.
http://a3.sphotos.ak.fbcdn.net/hphotos-ak-snc4/163683_193602623990103_100000211005372_804724_206727_n.jpg

Then, while on the way to Majistreet Court (I will elaborate on this in a very very long writing to tell what happened when the case is settled. Suing people is a lot harder than I thought), there's new road and old road joint on the way to Danga, which I didn't saw it and just cruise on the joint. Which caused?

Rolla's a bit too low for daily usage actually. The front spoiler hit the joint, which caused nothing to the spoiler since it is a FRP. BUT, the lower panel was damaged. You can see how the impact had change the lower panel's shape and it didnt stop there. Even the front grille, and the left headlamp cover were affected too. And to add some spice, the right lower panel screw joint were detached. Need to weld it back to fix it. That bad uh the price I pay for having such low ride. And I wont raise the height back coz tall is lame. HAHA.


As for now, my old lip was sold. Sold to a very close friend of mine. Hope he'll success in his new project. All the best buddy! How bout Rolla? Well, Retro Bodykits which is one of my sponsor for Rolla, will send a new front spoiler which is the latest product of Retro Bodykits.
http://a3.sphotos.ak.fbcdn.net/hphotos-ak-snc4/162637_156234787760950_100001232899353_327278_3720131_n.jpg

Some car with the similar front spoiler. Taken out of JNC and Uncle Google.
http://a7.sphotos.ak.fbcdn.net/hphotos-ak-snc4/163815_156234924427603_100001232899353_327284_4631369_n.jpg
http://a4.sphotos.ak.fbcdn.net/hphotos-ak-snc6/165755_156234881094274_100001232899353_327282_3669712_n.jpg

And finally, something is on the way to JB. I am very skeptical with the function or maybe its me who cant differentiate the difference of a car that does not have an anti-roll bar and a car that have it on the axle. We'll see. But since it is a bargain price tag, I just bought it. Will fit it. Theoretically, it is plug and play since I am using the AE86 LSD, which already have the bracket to hold the ARB.

http://202.76.227.240/images/51/5197244862.jpg